Hello guys. Here's a new 100% working trick to hack windows password .
I know there's a lot of softwares out there to get it done . But thats not geeky & also not time consuming . The real fun is when you can hack this manually within just a few minuets .
So here are the steps to do it.
Required things:
1) Windows 98 bootable USB drive ( We will learn to make it as we proceed) .
2) Basic knowledge of DOS commands .
3) Basic knowledge of how to boot your PC from a USB drive .
Theory:
Now you may wanna know the theory behind this hack . So here's how we do it .
In windows we can change the password of the PC with command prompt very easily .
with the command line net user username password . (replace username & password with the credentials you want ) . But this can be possible only if you have admin access to the command prompt . A command prompt with admin access is called elevated command prompt . When you simply open a command prompt window it brings you to the C:\users\username directory . But in an elevated command prompt you are brought to the C:\windows\system32 directory .
So if we can start an elevated command prompt window in the windows login screen, then we can run the above said command and change the password to what we want . So the main problem is how can we do this .
There are some programs which we can run directly from the login screen. These are our keys to hack a windows password .
The programs are:
1) sethc.exe ( windows xp , windows vista )
2) narrator.exe ( windows 7 , 8 )
3) magnify.exe ( windows 7 ,8 )
There are more but these will be enough for us . In windows 7 & 8 we can access them by clicking on the " Easy of Access " button in the login screen & then selecting "narrator" or "magnifier" then "apply" & then "OK"
All these files are stored in the C:\windows\system32 folder . And also the file for command prompt is stored in this folder ( named cmd.exe ).
So if we can replace one of those above mentioned files with cmd.exe & then if we start those programs in login screen, we can get an elevated command prompt & then type the net usercommand to change the password & we can gain access to the system .
Now the question is how to replace those files with command prompt when we have no access to the system ? The answer is by using a live OS which we can boot from an external USB drive & then accessing the file system through it. Most people will suggest you to use a Ubuntu live CD . But Ubuntu is near about 800 MB in size . So I'll suggest you to use MS-DOS 98 with an external usb drive which is 3 MB in size .
Now here are the steps to make a Bootable MS-DOS 98 usb drive:
1) Download DOS 98 from the link given below .
2) Download HP USB Disk Storage Format Tool form the below link .
3) Unzip & install the HP USB Disk Storage Format Tool .
4) Unzip DOS 98.zip and extract the folders ms-dos & ntfs dos . Remember the location .
5) Plug in your USB drive ( pen drive ) in your pc . ( make sure you backed up your contents of the pen drive, because your pen drive will be formatted . )
6) Now run HP USB Disk Storage Format Tool . ( in windows 7 right click on it & run as administrator ).
7) Now on the device window select your pen drive . In my case it's kimgston data travelar... .
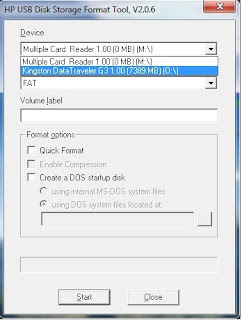
8)now in the file system select FAT . & tick both "quick format" & "Create a dos startup disk" .
9) now click on the 3 dots next to the box & select the ms-dos folder you extracted earlier . & press ok .
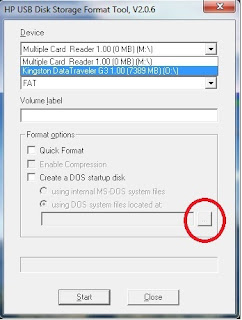
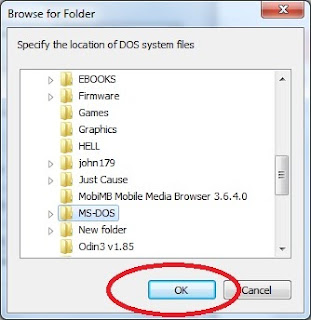
10) Now press start . Let the process complete .
11) Now copy the contents of NTFS folder in your pen drive .
Thats it . Now your bootable USB pen drive is ready .
Now here comes the main part.
Booting the target PC with this pen drive:
Switch on the target pc with the pen drive pluged in . And wait until a black ( sometime blue ) screen appears . There you will see some options like ** to enter setup , ** boot menu etc . In my case it's like F10 - to enter setup , Esc - Boot menu . Press the button which says Boot menu ( in my ps it's Escape button ) & select the pen drive from the list of available devices. Now you should see the dos window .
*Check your PC's BIOS manual for more info on accessing boot menu. Some PCs don't have the Boot menu . In such cases you need to Enter Bios setup by pressing the particular key ( in my case it's F10 ) & then change the boot device order as Removable media in the first place .
**To know more about how to change boot order of a PC follow these links or refer to the BIOS manual.
http://lifehacker.com/5991848/how-to-boot-from-a-cd-or-usb-drive-on-any-pc
http://pcsupport.about.com/od/fixtheproblem/ss/bootorderchange.htm
Real Hacking Begins Here:
If you booted correctly from the usb drive, you should now see the dos prompt. something like this with the C:\ prompt .
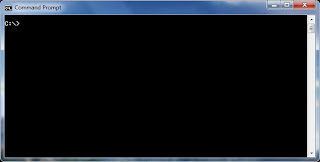
Now the first thing to do is to find out the windows instalation directory .
For this just change the drives serially , check for the windows directory in that drive with dircommand .
Your commands should look like this:
C:\> D: (press enter) --------- Changes the prompt to drive D.
D:\> dir (press enter) --------- Lists all the files and folders in the drive D .
D:\> some results with files & folders. -------- Search for the windows folder here.
You should probably find it here in the drive D . If not then change the dir again to E .
D:\> E: (press enter) --------- Changes the prompt to drive E.
E:\> dir (press enter) --------- Lists all the files and folders in the drive E.
E:\> some results with files & folders -------- Search for the windows folder here.
If not found repeat the process with F , G , H , drives serially untill you get the windows folder .
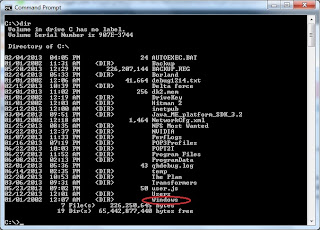
In the below image the windows folder is in C drive . We get the below result after executing the following command .
C:\> dir (press enter )
Now suppose you get the windows folder in D: drive .
You should return on the D:\> prompt automatically .
Now type the command cd windows\system32 (press enter).
You should now see D:\windows\system32> on the prompt .
Now type the following commands exactly as they are.
copy narrator.exe c: ( press enter )
copy cmd.exe c: (press enter)
del narrator.exe (press enter)
ren cmd.exe narrator.exe (press enter)
This should look like this.
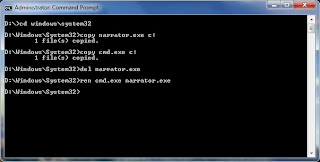
Thus we replaced the narrator.exe file with cmd.exe .
Now whenever we start the narrator process we will get the Elevated Command Prompt .
Changing The Password:
Now restart your PC normally . without the pen drive plugged in .
Now when you are on the login screen . Click on Easy of access on the left bottom corner . And tick the narrator > Apply > OK . In no time you'll get a command prompt window . Like DOS .
Now type in the command net user your_username your_new_password .
Suppose the user name is computer , then type net user computer 12345 (enter) . And the new password will be 12345 .
Now close the command prompt & enter your new password in the box & go . Bingo ! now you have access to the system .
***Note
In windows xp there's no "easy of access button" so you have to change the commands a little .
copy sethc.exe c: ( press enter )
copy cmd.exe c: (press enter)
del sethc.exe (press enter)
ren cmd.exe sethc.exe (press enter)
And then on the login screen press "shift" key five times in a row & the command prompt will appear . Least of tutorial is same for windows xp .
If i was not clear at any point please let me know to help you out in the comments section.
This hack was successfully tested on win 7 & 8 . But i hope the above said WIN XP hack will also work . Let me know if it works.
I'm posting this tutorial only for the password recovery purpose in case you forgot your windows password . I'll not be responsible for any kind of illegal usage of this tutorial .
Download links to the files:
HP USB Disk Storage Format Tool
MS-DOS 98+NTFS DOS




 Subscribe in a reader


